Working with Windows Live Movie Maker was quite fun. At first I was frustrated because I didn't understand what I was doing, but after I got going, it became clearer and with practice using this app will become second nature. Some of the features have been moved around because I have the latest version of Windows Live. For example, the audio mixer was moved to the project tab...um that made no sense to me. Why not put it in the audio group? I also had issues with the splitting feature. This is where you can remove any portion of a video you no longer want. I didn't quite understand fully how this works, but with practice I will master this. Playing around with the features like adding titles, changing background color, adding animations etc., got my creative imagination running wild. I loved all of the saving and publishing options including saving in HD format. One of the coolest features is the AutoMovie where you can apply a theme and Windows Live Movie Maker will make the movie instantly.
I've never done anything like this before other than using my digital
camera and now my Razr Maxx smart phone to create videos. Now that I've
gotten my feet wet messing around with this application, I want to do
something fun with the video of my oldest granddaughter's ballet recital
and incorporate still shots of her little sister's performance (I did
not get a video of her performance sad to say). Then, I shall surprise
the girls and their parents with grandma's brilliant creation, ha! One
of the things the chapter discusses is how to publish a movie (or any
video) to YouTube. This is something I have done with the dance recital I
mentioned above. It is a terrific way to share a video with family
members who would be interested in seeing it.
This is my final post for this class. It's been a fun learning experience working my way through the chapters and various capabilities of Windows 7. The final activity is a question and answer session about Movie Maker, such as what are the basic steps to create a movie, what is a transition, an effect. This last chapter is my favorite because it's new and I love learning new things.
Saturday, July 28, 2012
Chapter 8 Mastering Digital Pics & Music
I've been working with digital pictures and music files for a long time. I already knew how to import pictures from my digital camera to the computer, edit, enhance, save, print or order prints online. I did this without using the applications that comes with Windows, preferring to use third party software. It was a nice change of pace to learn how to use the Windows applications to work with my digital files, I loved some of the features and the ease of use.
For example, I like how easy it is to rename a group of files, and tagging them to make files easier to find. The text book emphasizes the importance of making a backup copy of pictures you edit in case you make a mistake and can't go back to the original. I always do this anyway, but it's nice to be reminded and also learn another way to create backups without the old right click, copy, name the file, save. I loved the option to view pictures and videos with the aid of a table of contents.This allows you to see your picture and video files by location on the computer along with details of each file.
One of the differences from the text book and the latest version of Windows Live was encountered during the editing pictures segment. To correct red-eye in a picture, the text book says to click the 'Fix' button. Instead of a 'Fix' button I would select an option on the 'Adjustments' ribbon such as 'red eye'. The red eye feature is pretty straight forward. To correct red eye in your photo you trace a rectangle around the eye using the mouse pointer. The application automatically adjusts without any other interaction on my part. One thing that I noticed was a 'Fine tune' button. I clicked on this and a navigation panel opened on the right side of the screen with options to adjust exposure, color, straighten photo, adjust detail. I really liked that! This application won't replace my Microsoft Digital Image Pro for editing photos but I will use it for quick and easy touch-ups such as the red eye feature. One other feature I found very useful is when you do make changes to a file such as applying a black and white filter, you can easily revert back to the original picture later after making changes. You can also order prints online through the gallery using order prints online dialog box. I almost always use Walgreens which isn't one of the options. I go to the Walgreens website to upload photos to order prints. It's convenient for me because I live very close to a Walgreens.
Windows DVD Maker allows you to make a DVD of your files. I've not made DVD's this way but it's pretty straight forward and easy, so I can see myself using this application in the future.You can use Windows Media Player (WMP) to sync your Mp3 player with your music files, rip music from CDs to your library, play your music, and burn CDs. I did like using the Player to rip music and create a music CD. There was more flexibility (or so it seem) than when using iTunes to do this. Creating a playlist was easy enough, comparable to using iTunes.
The activity for this chapter involved using Help and Support to learn more about using WMP, answering questions on the various functionality of the Player. I learned that one of the conditions that needs to be met for WMP to default to automatic sync is the device storage capacity must be 4GB or more. Another condition is your entire Player library must also fit on the device. I have a 160GB iPod and my music library is under 12GB at this time. However my other device is only 1GB, so I would need to manually sync the files in this case.
Monday, July 16, 2012
Chapter 7 Advanced File Searching
This week's chapter is dedicated to learning to use the various search functions and techniques available in Windows 7. Most of my searches are very basic with an occasional wildcard search where an asterisk is used to indicate an unknown part of the file name. At my job, I use the Boolean method frequently using the company's mainframe interface but have not ever tried this on a windows interface. I can understand how useful this particular search function can be for Windows 7 users. It is more advanced, and requires knowledge of how operators work. Creating a cheat sheet will help speed up the learning curve for all of the searches available.
An example of a boolean search is using the word AND (must be in capital letters for this to work). The text book example is to type koala AND jpg into the search bar, press enter. The file found is a picture file named Koala.
An example of exact phrase search given by the text book: type into the search bar "Microsoft Windows", press enter. The quote marks around the words indicates that this is the exact phrase to be searched.
One of the search functions that I found most useful is complex combining a file property and a range. Your friends will be impressed by your skills if you learn to master this function, lol. The example the text book gives is to search for files between the size of at least 10MB and less than 30 MB. Type into the search box: size: > 10MB AND < 30MB, press enter. The laundry list of files within that range displays.
In the screen that displays search results, scroll down to find a list of options to search again to narrow the scope of your search. These options are Libraries, Homegroup, Computer, Custom, Internet, File Contents. The Custom button allows you to change the search by using the 'choose search location' dialog box to create a custom scope. This allows you to narrow the current search to another location.
If you want to use natural language to search rather than try to remember the fancy schmancy advanced Boolean operators and property names of other searches, Windows 7 has a way to do this too. For example, click the Organize button in the Windows folder, select Folder and search option, click search tab, select Use natural language search, click ok. The text book says to type flower pictures in the search box. A list of files displays with the word flower as part of the file name. Reverse the steps taken to turn on the natural language feature so that you now turn it off. Repeat the search, and the results will be nothing.
Other searches includes filter files using file list headings (pretty handy); using the file's properties to refine searches such as tag:, date:, authors:, genre: title: and size:. Again, creating a cheat sheet will help speed up the learning process on what filters and properties are available.
I learned how indexing plays a part in the speed of finding files on the computer. Indexing helps keep track of files and folders stored in indexed locations. By default Windows 7 indexes each user's personal folders, which contains the Documents, Pictures, Music, and Video libraries. You can add any folder to the indexing properties at any time, but our text warns that the index will not perform well if it grows too large. It is recommended that locations should only be added that contain personal files. Never add program or system files.
According to my text book, Windows 7 is supposed to have two default searches, one called Everywhere search and the other called Indexed Locations search. Neither one exist on my computer. I don't remember deleting those files, but they're not there. Kinda strange. You can also save your custom searches. Be warned however, deleting search results deletes the files from your computer! Be careful out there!!
Chapter 6 Customing Your Computer Using Control Panel
Chapter 6 covers using the control panel to customize your computer. There are eight main categories with links within each of the main categories. It is in the control panel where you will find the settings for the system and security of your computer, add devices, install/uninstall programs, set up or modify user accounts, change the clock/language/region, add an ease of use feature, and much more.
The System and Security category is where you can view settings for the Firewall, change system settings, configure Windows Update, change the power settings, schedule backups and much more. By default Windows 7 turns on the firewall to protect your computer from unauthorized users between your computer and the internet. If you happen to use a different firewall or security suite like I do (Norton's Security Suite) you will find Windows 7's firewall turned off and a message that says 'These settings are being managed by vendor application Norton 360' (see screen shot below). The Action Center is where you can review your computer's status and resolve issues, change user account control settings, troubleshoot common issues, and restore to an earlier time. Click on the System's link to see what your Windows Experience Index rating is. Mine isn't very good, 3.6, the lowest score is gaming graphics 3.6, all of the other scores are 7.2 for processor, 7.2 for memory, 4.7 for graphics, and 5.9 for primary hard disk data transfer rate.
Usually when I plug in a new printer, Windows configures it automatically, but you can add printers manually through the Hardware and Sound category. To do this you must know which port the printer is connected and find the printer in the list of devices so that the correct printer driver is installed.
I learned how to customize the mouse by clicking on the link under Devices and Printers that says 'Mouse'. You can configure the mouse buttons to behave differently, adjust the double-click speed, turn on Clicklock and/or Snap To, adjust pointer speed, and add a tail to the pointer. The Clicklock and Snap To features are useful. What the Clicklock does is allows you to click and drag select information without having to hold down the mouse button. The Snap To feature allows for the pointer to snap to the default button in any dialog box. Of the two, I would likely use Clicklock more.
Also in the Hardware and Sound category is a link to customize the AutoPlay features. This is something new to me. You can modify the settings for all media and devices, how they behave when inserted into the computer such as an audio CD, DVD movie, software and games, video files, pictures, audio files.
If you want to uninstall an application, you can do this using the Programs category. Click on the 'uninstall a program' link under Programs and Features. Here you can also view installed Windows updates, turn Windows features on or off, view the personalize gallery, configure older applications to run in Windows 7, add/customize desktop gadgets, and view how to install a program.
The User Accounts and Family Safety category has a link called Windows CardSpace. This is something I am totally unfamiliar with. Apparently this is to manage information cards that are used to log on to online services. Microsoft says Windows CardSpace can replace the user names and passwords that you use to register with and log on to websites and online services. Wikipedia claims that on February 15th 2011, Microsoft announced that Windows CardSpace 2.0 will not be shipped. Microsoft is currently working on a replacement called U-Prove. I guess I won't be investigating any more about this. I probably wouldn't use this feature anyway. The other features of this category includes creating and managing user accounts, setting up parental controls for accounts, and set up mail profiles.
The other categories in the Control Panel are Network and Internet, Appearance and Personalization, Clock/Language/Region, and Ease of Access. The Clock/Language/Region allows you to adjust the date and time, with region and language options. Ease of Access makes the computer easier to use people who have mobility, hearing or vision impaired. People like myself who are hard of hearing may find some of the features useful. There's an option called Sound Sentry that turns on captions when a program speaks or makes sounds if captions are available. I'll have to give this a try to see if it will work for me.
I haven't had a chance to complete the activities for this chapter but when I do I will update this post with my comments.
The System and Security category is where you can view settings for the Firewall, change system settings, configure Windows Update, change the power settings, schedule backups and much more. By default Windows 7 turns on the firewall to protect your computer from unauthorized users between your computer and the internet. If you happen to use a different firewall or security suite like I do (Norton's Security Suite) you will find Windows 7's firewall turned off and a message that says 'These settings are being managed by vendor application Norton 360' (see screen shot below). The Action Center is where you can review your computer's status and resolve issues, change user account control settings, troubleshoot common issues, and restore to an earlier time. Click on the System's link to see what your Windows Experience Index rating is. Mine isn't very good, 3.6, the lowest score is gaming graphics 3.6, all of the other scores are 7.2 for processor, 7.2 for memory, 4.7 for graphics, and 5.9 for primary hard disk data transfer rate.
 |
| Firewall managed by Norton's 360 |
I learned how to customize the mouse by clicking on the link under Devices and Printers that says 'Mouse'. You can configure the mouse buttons to behave differently, adjust the double-click speed, turn on Clicklock and/or Snap To, adjust pointer speed, and add a tail to the pointer. The Clicklock and Snap To features are useful. What the Clicklock does is allows you to click and drag select information without having to hold down the mouse button. The Snap To feature allows for the pointer to snap to the default button in any dialog box. Of the two, I would likely use Clicklock more.
Also in the Hardware and Sound category is a link to customize the AutoPlay features. This is something new to me. You can modify the settings for all media and devices, how they behave when inserted into the computer such as an audio CD, DVD movie, software and games, video files, pictures, audio files.
If you want to uninstall an application, you can do this using the Programs category. Click on the 'uninstall a program' link under Programs and Features. Here you can also view installed Windows updates, turn Windows features on or off, view the personalize gallery, configure older applications to run in Windows 7, add/customize desktop gadgets, and view how to install a program.
The User Accounts and Family Safety category has a link called Windows CardSpace. This is something I am totally unfamiliar with. Apparently this is to manage information cards that are used to log on to online services. Microsoft says Windows CardSpace can replace the user names and passwords that you use to register with and log on to websites and online services. Wikipedia claims that on February 15th 2011, Microsoft announced that Windows CardSpace 2.0 will not be shipped. Microsoft is currently working on a replacement called U-Prove. I guess I won't be investigating any more about this. I probably wouldn't use this feature anyway. The other features of this category includes creating and managing user accounts, setting up parental controls for accounts, and set up mail profiles.
The other categories in the Control Panel are Network and Internet, Appearance and Personalization, Clock/Language/Region, and Ease of Access. The Clock/Language/Region allows you to adjust the date and time, with region and language options. Ease of Access makes the computer easier to use people who have mobility, hearing or vision impaired. People like myself who are hard of hearing may find some of the features useful. There's an option called Sound Sentry that turns on captions when a program speaks or makes sounds if captions are available. I'll have to give this a try to see if it will work for me.
I haven't had a chance to complete the activities for this chapter but when I do I will update this post with my comments.
Sunday, July 8, 2012
Chapter 5 Personalizing Your Work Environment
I must say that working through chapter 5 was a happier experience than last week's chapter!
There are many ways to customize Windows 7 to suit your personal tastes. Chapter 5 covers personalization of the desktop (and using a desktop theme), sound, screen saver, mouse pointers, desktop icons, taskbar, display, notification area, start menu, and folder options. It is fun experimenting with the various options and settings. If you mess up something or you do not like what you've created, you can always click the RESTORE DEFAULTS button.
The options for customizing your desktop is virtually limitless. If you don't like any of the themes included with windows, you can create a new one using your own pictures to give your working environment a distinctive look. In the panel where the themes are located, there's a link to 'get more themes online'. You can customize the window color. This means the color of your task bar and the borders around a window. The options include setting the color intensity, and a color mixer panel which I had some fun with. I got the perfect shade of purple playing around with these settings. I prefer to use a single picture instead of a slide show for my desktop background. I also use window's default settings for window color, sounds, and mouse pointers. I don't use screen savers. Years ago I did when it was more important to have one to avoid the background picture from burning into the monitor screen. Instead of a screen saver, I use power management to shut the monitor off and put the computer to sleep after two hours.
Also if you're using a slide show for your desktop theme, you wouldn't need a screen saver so it would be redundant to use one....but that's just my opinion!
You may have noticed that by default Windows 7 displays just one icon on the desktop, the Recycle Bin. You can add other icons if you wish through the Desktop Icon Settings dialog box. The icons to choose from are Computer, User's Files, Network, Control Panel and of course the Recycle Bin. I prefer a clean desktop with as few icons as possible. Presently I have one folder on the desktop in addition to the Recycle Bin. It is entitled 'Stuff', lol. A bunch of 'stuff' is in this folder, some miscellaneous pictures, shortcuts, 'stuff' from my previous CIS classes...just stuff and more stuff. Hee hee.
One of the more useful functions of Windows 7 is adding a toolbar to the taskbar. Adding the address toolbar allows you to search for a web page, start a program, open a document, and open a folder! Pretty spiffy. Another customization feature is to pin an item to the taskbar. I have a few items pinned to mine beyond the default pinned items. Google Chrome, Firefox, iTunes, Windows Live Mail, and Mahjong Titans. You can move the taskbar to another area on the desktop...to the either side vertically or move it to the top. I've always preferred mine pinned to the bottom ... it drives me nuts to have it anywhere else!
In the notification area you can change the behavior of the notification icons. I suppose if you were tired of seeing the same notification pop up all the time, you'd want to turn it off. This can be done through the Customize Notification Icons window.
I like how you can modify the appearance of the Start menu by changing the number of recent programs to display or alter the look and behavior of menu items. I can see myself using this option either to add and to reduce. Sometimes I want more to show and sometimes I want less clutter in the start menu. The Customize Start Menu dialog box allows you to do more than adjust the recent programs to display. There are tweak options for Computer, Control Panel, Documents, Downloads, Games, and more.
Another way to customize your work environment is by changing the folder options. If you prefer to have each folder open up in its own window, this can be done through the Folder Options dialog box under the General tab. Personally I like the default setting where each folder is opened in the same window. You can chose to single-click to open an item or double-click (which is the default). Other tweaks can be made by clicking on the View tab. One of the options that I occasionally change is the Hidden files and folders. By default windows doesn't show hidden files, folders or drives. Sometimes I NEED to see these items and through the View tab I can select to Show hidden files, folders, and drives.
The activities for this chapter included taking snips of various screen shots and answering questions about Power Plans, Folder Options, and Address Toolbar display/content results. One of the snips taken shows that the Address toolbar has been added to my taskbar. The other snips are of screen shots that shows the results of various searches using the Address toolbar.
The key lesson learned from this chapter is that there is no wrong or right way to customize your desktop. It is very much the idea of whatever floats your boat is the right way.
There are many ways to customize Windows 7 to suit your personal tastes. Chapter 5 covers personalization of the desktop (and using a desktop theme), sound, screen saver, mouse pointers, desktop icons, taskbar, display, notification area, start menu, and folder options. It is fun experimenting with the various options and settings. If you mess up something or you do not like what you've created, you can always click the RESTORE DEFAULTS button.
The options for customizing your desktop is virtually limitless. If you don't like any of the themes included with windows, you can create a new one using your own pictures to give your working environment a distinctive look. In the panel where the themes are located, there's a link to 'get more themes online'. You can customize the window color. This means the color of your task bar and the borders around a window. The options include setting the color intensity, and a color mixer panel which I had some fun with. I got the perfect shade of purple playing around with these settings. I prefer to use a single picture instead of a slide show for my desktop background. I also use window's default settings for window color, sounds, and mouse pointers. I don't use screen savers. Years ago I did when it was more important to have one to avoid the background picture from burning into the monitor screen. Instead of a screen saver, I use power management to shut the monitor off and put the computer to sleep after two hours.
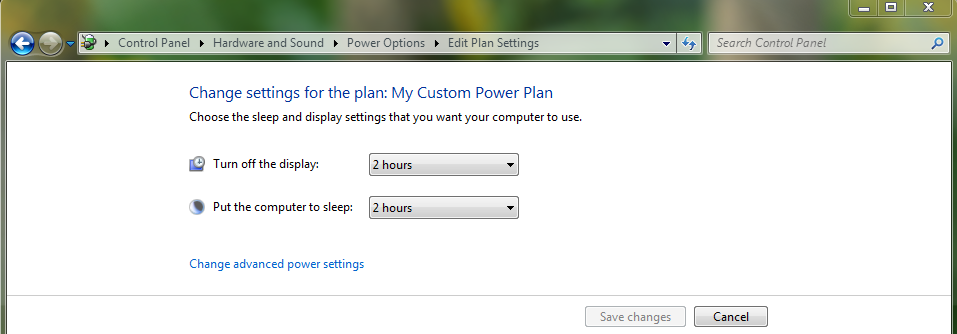 |
| My custom power plan |
Also if you're using a slide show for your desktop theme, you wouldn't need a screen saver so it would be redundant to use one....but that's just my opinion!
You may have noticed that by default Windows 7 displays just one icon on the desktop, the Recycle Bin. You can add other icons if you wish through the Desktop Icon Settings dialog box. The icons to choose from are Computer, User's Files, Network, Control Panel and of course the Recycle Bin. I prefer a clean desktop with as few icons as possible. Presently I have one folder on the desktop in addition to the Recycle Bin. It is entitled 'Stuff', lol. A bunch of 'stuff' is in this folder, some miscellaneous pictures, shortcuts, 'stuff' from my previous CIS classes...just stuff and more stuff. Hee hee.
One of the more useful functions of Windows 7 is adding a toolbar to the taskbar. Adding the address toolbar allows you to search for a web page, start a program, open a document, and open a folder! Pretty spiffy. Another customization feature is to pin an item to the taskbar. I have a few items pinned to mine beyond the default pinned items. Google Chrome, Firefox, iTunes, Windows Live Mail, and Mahjong Titans. You can move the taskbar to another area on the desktop...to the either side vertically or move it to the top. I've always preferred mine pinned to the bottom ... it drives me nuts to have it anywhere else!
In the notification area you can change the behavior of the notification icons. I suppose if you were tired of seeing the same notification pop up all the time, you'd want to turn it off. This can be done through the Customize Notification Icons window.
I like how you can modify the appearance of the Start menu by changing the number of recent programs to display or alter the look and behavior of menu items. I can see myself using this option either to add and to reduce. Sometimes I want more to show and sometimes I want less clutter in the start menu. The Customize Start Menu dialog box allows you to do more than adjust the recent programs to display. There are tweak options for Computer, Control Panel, Documents, Downloads, Games, and more.
Another way to customize your work environment is by changing the folder options. If you prefer to have each folder open up in its own window, this can be done through the Folder Options dialog box under the General tab. Personally I like the default setting where each folder is opened in the same window. You can chose to single-click to open an item or double-click (which is the default). Other tweaks can be made by clicking on the View tab. One of the options that I occasionally change is the Hidden files and folders. By default windows doesn't show hidden files, folders or drives. Sometimes I NEED to see these items and through the View tab I can select to Show hidden files, folders, and drives.
The activities for this chapter included taking snips of various screen shots and answering questions about Power Plans, Folder Options, and Address Toolbar display/content results. One of the snips taken shows that the Address toolbar has been added to my taskbar. The other snips are of screen shots that shows the results of various searches using the Address toolbar.
The key lesson learned from this chapter is that there is no wrong or right way to customize your desktop. It is very much the idea of whatever floats your boat is the right way.
Subscribe to:
Comments (Atom)